Paradise in the Panhandle

17 05 2015

SAM_2180

We spent the past week vacationing in Seacrest Beach, West of Panama City Beach.  We stayed in a beautiful home just a few minutes walk from the beach.  As usual, our vacations revolve around food and we continue to be those jackasses who take pictures of their food while on vacation.  We went out to some great restaurants and cooked some terrific meals.  Our rental house was extremely accommodating in every way imaginable.  It is very clear that the owners are passionate about cooking and are concerned that their guests have the nicest stay possible.  We would definitely return to this location and this rental home.

Cowgirl Kitchen

Cowgirl Kitchen was a great little bar and restaurant at Rosemary Beach.  They had excellent beer, wine, and food.

IMG_1078

Tuna Dip

IMG_1084

Whole Hog Pizza – I’m daydreaming about this right now

 SAM_2041

Brownie A la Mode to go

Glazed Chicken Thighs and Homemade Cheddar Biscuits

SAM_2038


Donut Hole

The Donut Hole is a bakery/restaurant in Inlet Beach.

IMG_1097

 Red Velvet and Chocolate Sprinkle Donuts

IMG_1105

Sweet Potato Praline Pancakes

IMG_1104

The “Diet Plate”

Shrimp Guacamole

SAM_2075

Seasoned and seared some small shrimp

SAM_2078

SAM_2082Served on tortilla chips

Waffles with Strawberry Compote and Fresh Whipped Cream

SAM_2095

SAM_2104

SAM_2105

Fresh whipped cream with a dash of vanilla.  Like I said earlier, our house’s kitchen was very accommodating.  The only equipment I brought was my gyuto.

SAM_2108

Don’t forget the mimosas

SAM_2113

Shrimp Skewers and Sautéed Vegetables
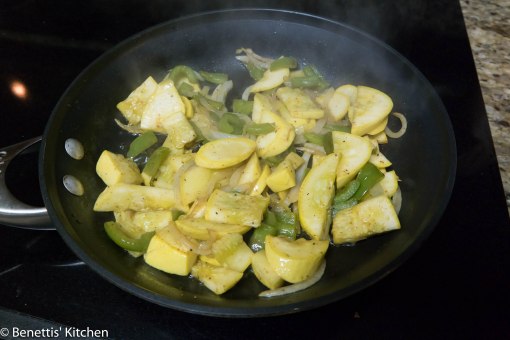
  SAM_2139

SAM_2148

SAM_2151

Charlie’s Donuts

Charlie’s Donuts is a donut truck in Aly’s beach.  You have to get there early before they run out.  Amy was nice enough to run (literally) over there first thing in the morning.

SAM_2183

Yep, that’s bacon on the right.  These were very well done but a bit on the sweet side (yeah, even for donuts).

The Hub – Mile Marker Fifteen

The Hub is the center a new development a few miles West of where we were staying.  It was about a 20 minute bike ride, following the 30a bike and pedestrian trail.  The idea of The Hub is pretty cool – it is a centralized place where people can get together to watch live music, and other events, and have various options for food and drink.  They have a lot of comfortable seating.  Mile Marker Fifteen is their Mexican restaurant/bar.  Everything there is counter service.

IMG_1114

Taquitos with Guacamole – Cooked chimichanga-style, very good

IMG_1115

Sweet Potato and Chorizo Tacos – Even better

Grilled Fish and Zucchini

SAM_2220

SAM_2227

Added in some sweet potato fries

SAM_2229

And some wonderful tomatoes – I wish we could get this good of tomatoes at home this time of year

Cowgirl Kitchen Round 2

We needed a quick lunch that accommodates a quickly expiring 2 year old, so we decided to go back since we had such a good dinner there.

IMG_1128

Amy’s blackened shrimp quesadilla.  My pulled pork sandwich, with cole slaw on it, was very good but not particularly photogenic.


Espresso!

3 08 2014

After using our Bialetti stove-top espresso maker, for many years, we finally invested in a pump espresso machine.  We decided on the low-end De’Longhi 15-bar pump espresso machine.  As far as we could tell, it made just as good of coffee as machines that are double the price and it took up less counter space.  It makes excellent espresso, though I believe it has become the catalyst for a new addiction.

SAM_0196

SAM_0199

SAM_0204


Let There Be Pasta!

21 07 2013

IMG_5566

We have wanted to make fresh pasta for many years.  We only dabbled in rustic pastas due to not wanting to invest in a pasta roller and cutter.  This all changed when we found a pretty good one on clearance.  We decided that a manual one would fit our needs better, though we could have gotten one to attach to our stand mixer.

Making pasta is actually much simpler than you may think.  You only need 3 ingredients:

IMG_5540

  • 2 Cups Unbleached Flour
  • 3 Eggs
  • 1/2 tsp. Salt

IMG_5539

First off, make sure your assistant has all of her equipment ready.

IMG_5543

Place your flour into a mound and form a cup in the center.  Add your 3 eggs and salt to the flour cup.  As you can see here, I did not make my cup big enough and my eggs overflowed.  I won’t make that mistake again as it was a PITA!  Using a fork, whisk the eggs.  Slowly work the eggs into the flour from the center out.

IMG_5546

Using a dough knife, fold the egg and flour mixture into itself until it has thoroughly combined.  Using your hands, form the dough into a ball.  I quickly found out that my dough was too wet as it glued my hands together.  I slowly added flour until the dough was workable.

IMG_5548

Using the palm of your hand, kneed the dough for at least 5 minutes.

IMG_5549

Form a ball with the dough.  Let it rest for at least 15 minutes.

IMG_5550

Cut it into 3 pieces and form those into smaller balls.

IMG_5552

Press the dough flat about 1/2 inches thick using the palm of your hand.  Make sure both sides are floured.

IMG_5553

Starting at the largest thickness, run your dough through the pasta roller.

IMG_5554

Use one hand to carefully pull the dough along, being careful not to stretch it.

IMG_5556

Decrease the thickness by one level each pass until your reach your desired thickness.  I was making fettuccini, so I took it down to level 2 on my machine.  After each pass, if the pasta gets sticky, sprinkle on a small amount of flour.

IMG_5560

Make sure both sides of your pasta are floured otherwise you will be scraping it off of your workspace.

IMG_5562

Run the dough through the cutter die.  It helps to have a second hand to pull the cut pasta along.

IMG_5566

Make sure your pasta has enough flour (preferably semolina) on it to not stick to itself.  We were going to be cooking ours soon so we just cut it to lengths that would fit on a cookie sheet and let it sit out.  If you plan on using your pasta in the future, you might want to hang it to dry for a couple hours before refrigerating or freezing it.

IMG_5567

Cook your pasta in lightly salted, boiling water for around 5 minutes, until it reaches your desired chewiness.  Keep in mind, if you plan on tossing it with sauce, over heat, you may want to undercook it some so it doesn’t end up overcooking in your sauce.  Make sure you remove it from the water as soon as it is done or it will continue to cook.  You might also want to run some cold water over it to stop it from cooking any further.

IMG_5569Toss your pasta with your favorite sauce and enjoy!  We had a basil-almond pesto, in the freezer, we had made a couple months ago.  If anyone is interested, we can do a post on making pest sometime.  Pesto doesn’t have to be the over-garlicy crap you get at the grocery store.  We are hoping to make some ravioli next time; perhaps tortellini if we can get down the technique.

IMG_5570Make sure your assistant gets her share.


Basil Fried Rice

16 09 2012

Basil Fried rice is a quick and easy dinner that the whole family will enjoy.  We like to make potsticker with ours.  Keep your eyes open for a quick post on making perfect potstickers.

Ingredients

White rice – Probably about 4 cups cooked.  I like to use Basmati.

2-3 Cloves of garlic

1/2 Medium Onion

1-2 Small Chili Peppers

Fresh Basil – I love to use Thai Basil.  Italian basil will do fine if you can’t find Thai.

Protein – I usually use chicken or tofu.

1/4 Cup Soy Sauce

2 Tbsp. Fish Sauce – Fish sauce is basically fermented fish.  It sounds and smells terrible, but I assure you that it is cooking gold.  I think if you look up umami in the dictionary, you will find a bottle of fish sauce.

1 tsp. Sugar

Directions

Start by getting your rice cooking.  Chop up your vegetables and set aside.

Cut up your chicken breast.  I like to shave it into thin slices.

Add oil to your pan and heat.  Add your garlic and chilis.  Cook for a couple minutes.

Add your onion and chicken.

Add the sugar, soy sauce, and fish sauce.  Cook on high until the chicken is cooked through.

Add your cooked rice and stir-fry for a couple minutes.

Remove from the heat and stir in your basil.

Enjoy!


Zucchini Brownies

31 07 2012

Enjoy!

We are back!  How can something so small take every bit of free time we once had?!  ; )  Unfortunately due to a bug infestation in our garden and community garden, we are unable to grow zucchini plants, so we rely on others for our summer supply.  Jon’s dad came to visit his granddaughter and brought us several large zucchinis from his garden!  Now that we have a food processor, shredding the zucchini is much easier and our fingers/ knuckles do not end up wounded.  As was mentioned in a past post (speaking of, these zucchini brownies are SO much better than the last ones we blogged about), we shred the zucchini and freeze it in two cup quantities so it is ready for most recipes.  Speaking of food processors, in the near future, we will start blogging about making our own baby food.  Good times!

Ingredients

Ingredients: 1/2 cup Olive Oil 1/4 cup sugar 1/4 cup brown sugar 2 teaspoons vanilla extract 2 cups all purpose flour 1/2 cup unsweetened cocoa powder 1 1/2 teaspoons baking soda 1 teaspoon salt 2 cups shredded zucchini 1/4 cup chopped walnuts (or whatever amount you prefer) 1/4 cup chocolate chips (or you can leave out) Directions:Preheat oven to 350 degrees F and prepare a 9″ x 13″ baking dish with nonstick spray.

Large Bowl Ingredients

In large mixing bowl, combine olive oil, sugars, and vanilla. As a side note, the next time I make these, I will probably only use 1/2 cup brown sugar. They were plenty sweet enough for our liking and it would help make them a little healthier.

Small Bowl

In smaller mixing bowl, combine flour, cocoa powder, baking soda, and salt.

Combine

Slowly add the flour mixture to the olive oil mixture.  This mixture will be somewhat dry and crumbly.

Add Zucchini

Next, add the shredded zucchini, chocolate chips, and walnuts (the chocolate chips and walnuts are optional).  Mix all the ingredients together.  This batter will still be dry and crumbly.  Spread this batter into your prepared 9″ x 13″ baking dish.

Sound effects

My assistant was not very excited about this baking project!

Final Baking Instructions:

Spread the batter out in the baking dish and bake for approximately 20 minutes at 350 degrees F.  As with all baking, check the brownies towards the end of the time.  We like ours a little more moist and less done, that is why we bake them for 20 minutes.   Bake at 350 degrees F for 20 minutes.

Adapted from: http://mommyimhungry.blogspot.com/2010/11/frosted-zucchini-brownies.html


Newest Addition to the Benetti Kitchen

4 07 2012

Benetti Family

We have been a little “preoccupied” these past few weeks with the latest addition to our kitchen/ household.  On Father’s Day, we were given the best gift ever, Miss Lia Mae!  As we adjust to being new parents, things may be a little quiet on the blog.  There will probably be more posts to come with quick meals to the table and eventually, homemade baby food.  Now we present our little bundle of joy!


Taste of Cincinnati 2012

28 05 2012

If you live in or around Cincinnati, I hope you were able to make it to the Taste of Cincinnati this Memorial Day weekend.  We went down early today to avoid the crowds and heat.  It was still crazy hot which made a lot of food less desirable.  Here are a few pictures:

Opening Ceremony

Pretty excited about the roasted duck curry.

I got carried away and at half of it before I remembered to take a picture.  The duck fat just melted in your mouth; it was pretty amazing.

Amy’s first choice.

Mini Veggie Philly – This was really disappointing; hardly had anything on it, mostly bread.

Wouldn’t be Cinci without some pigs.  Amy is pointing to our neighborhood.

The stage was pretty quiet this early.

Getting busier.

Fishelman’s Fritter with Sweet Pepper Relish – Tasty, but tiny.  Could have been fried for a bit less time.

Amy finishing up her pretzel with beer cheese.

Getting ready to eat my fritters; ready to get out of the heat.


Lasagna Bolognese

28 05 2012

Most of us have come to expect lasagna to be layers of meat and sauce between sheets of pasta with some cheese on top.  Perhaps on the extreme end, with slices of zucchini or mushroom.  This recipe is certainly not the healthiest we make; quite the opposite actually.  However, it is the most delicious.  It will also feed quite a large family.

We found this recipe in Cook’s Illustrated magazine (online).  Cooks Illustrated, published by America’s Test Kitchen, is one of the few cooking magazines I will read.  If you enjoy fundamental cooking, make sure you catch America’s Test Kitchen on PBS.

There are two parts to this recipe: the meat sauce and the bechamel.  You can prepare the bechamel while your meat sauce is reducing.

Ingredients

Lasagna Noodles – I prefer to use the kind you have to cook

Grated Parmesan Cheese – I’d use the cheap stuff you get in the shredded cheese aisle.

Meat Sauce

1 Medium Carrot – Roughly chopped

1 Celery Stalk – Roughly chopped

1/2 Small Onion – Roughly chopped

28 oz. Can Whole Tomatoes with Juice

2 lb. Ground Meat – We used pork and  chicken

1.5 Cups Whole Milk – We used part whole and part skim

1.5 Cups Dry White Wine

2 Tbsp. Tomato Paste

Bechamel

4 Tbsp. Unsalted Butter

1/4 Cup Flour

4 Cups Whole Milk

3/4 tsp. Salt

Directions

Put a large pot of salted water on high heat.  Add you noodles when boiling.

Meat Sauce

Chop your vegetables.

Melt about 1 Tbsp. of butter in a large pot and cook your vegetables until soft.

Add your ground meat to the pot.  Break into small pieces as it browns.

When your water reaches a boil, add your lasagna noodles.  For a 9×13 pan, you will need 9 sheets; cook 1 or 2 extra.  You can skip this step if you decide to use no-boil noodles.

Add your 1.5 cups of whole milk (we used part skim milk).  Reduce to a simmer and cook until most of the liquid has evaporated (20-30 minutes).

Add the white wine and reduce until most of the liquid has evaporated (20-30 minutes).

Add the tomato paste.  Add the large can of whole tomatoes.  You can run them through if food processor first.  We cut them up prior to adding them.  They will break apart as they cook for another 15 minutes.  Salt and pepper to taste.

Bechamel

Melt the butter in a sauce pan over medium heat until foaming.

Add the flour to the pan.

Whisk continuously until the flour has cooked.  You are not trying to get this to darken like a typical roux.

Slowly whisk the whole milk into the roux.  Increase heat until it reaches a boil.  Reduce to medium and cook for about 10 minutes, stirring frequently to avoid the milk burning on the sides and bottom of the pan.  Allow to cool.

Assembly

Spray the bottom of your 9×13 glass dish with non-stick spray.  Apply a thin layer of your meat sauce to the bottom of the dish.

Add the first layer of the lasagna noodles.

Add a layer of meat sauce on top of the noodles.

Add a layer of bechamel sauce on top of the meat sauce.  Follow this same procedure (noodles-meat sauce-bechamel sauce) two more times.

Cover the top with a layer of parmesan cheese.

Bake at 425 degrees for 20 minutes.  If you use no-boil noodles, cover with foil and increase the time to 30 minutes.  Remove the foil and cook for another 15 minutes at 450 degrees.

Enjoy your mind-blowingly delicious lasagna!  Make sure you let it cool for at least 20 minutes before cutting.


Key West, FL

13 05 2012

I was going through some of our digital photos and I realized I hadn’t posted anything from our trip to Key West.  Our blog mainly focuses on cooking, but the best part of cooking is eating.  We love to travel to places that have distinct food cultures.  We decided to go on one last vacation before ??? comes along.  We settled on Key West as one of the places we really wanted to see, in the US, that could be done in less than a week.  I’m not a big fan of beach vacations or Florida in general, but Key West is like being in a whole different country.  It is one of the few places in Florida that I would voluntarily go back to.

I apologize for the quality of some of the pictures.  I try not to be the the jackass firing a flash in a a dim and crowded restaurant.

Please enjoy the food porn that follows………

Conch Fritters – I was pretty excited about eating conch before we went to Key West.  Conch fritters, like hushpuppies with bits of  conch, are an island staple.  I purposefully chose a place with these to have our first meal.

Amy really enjoyed her fish tacos.

You can’t goto Key West without having some Cuban food.

Garbo’s Grill – We found this great food cart near the water.

Kogi Korean BBQ Tacos – Made with beef short rib tips, these tacos were one of the best things I had on the island.

Mango Brie Quesadilla – Amy’s quesadilla was pretty spectacular, too.

Happy Hour – We are suckers for a good deal.

Chocolate Grilled Cheese – For my birthday, Amy made reservations at a dessert place – Better Than Sex.

Belgian Chocolate Truffle with raspberry sorbet.

French Dip – There was a terrific little bakery a block from our hotel.  We split a french dip sandwich, chips, cookie, and an Orangina for a light lunch.

Seafood Fettucini – I had this at Mangia Mangia, a less-touristy restaurant on the island.  All of their pasta is freshly made.  This dish included scallops, conch, and mahi-mahi.  I am usually leery about ordering pasta with seafood; the seafood tends to be overdone and of poor quality.  This one was cooked to perfection.

Rigatoni with Creamy Marinara – Amy opted to go meat-less.  Even most Clintonians get this pasta wrong;  Rigatoni has longitudinal ridges, mostaciolli does not.  So much of our childhood was a lie…

Pancakes with Macadamias – We needed a quick breakfast after doing some touring.  We wanted to avoid eating in the tourist district, but settled for this place on Duval St., not a bad choice.

My breakfast sandwich, served on ciabatta, came with probably a pound of tater tots.  It was like elementary school, but tasty.

We hit up another happy hour for dinner.  Tomatoes with mozzarella in the rear, fried calamari in the front.

Tempura lobster tail in the rear, peall-and-eat shrimp in the front.

This seafood market was just a few yards away from our hotel.  We didn’t have a chance to go there, but they advertised lobster rolls during the day.  Next time…

They actually fine you, if you don’t have proof that you ate key lime pie, when leaving the island.  Eat as much as you can!

I just couldn’t leave without eating some more conch fritters.  These were our favorite.

Amy’s fish and chips with sweet potato fries.  This was enough for 2-3 people.

Conch Po’boy – I guess I needed even more conch after the fritters.  This was really good, but enough for 2 people.

 I hope you enjoyed some of our Key West food pictures; we sure enjoyed eating it!  I really feel like a pig after seeing all that we ate over a 4 day period.  I could really go for some conch fritters right now.

Please come back later this week to see our post on the best lasagna you’ve ever had.


Lettuce Wraps

1 04 2012

Lettuce wraps are a simple and fun side or main dish.  The combination of hot, cold, crunchy, savory, and spicy makes for a burst of flavors and textures in your mouth.  These are a lot of fun for the whole family.  We served these lettuce wraps with some potstickers and miso soup.

Ingredients

1-2 lbs. ground meat (we used lean ground chicken and ground pork)

1 Head of iceberg lettuce

Part of an onion

1 Can of water chestnuts

Seasoning (we used hoisin sauce, soy sauce, and sriracha)

.

.

.

Directions

Separate your head of lettuce into individual leafs.  I have found that it works best to cut off the stem of the lettuce and then cut the head in half.

Roughly chop your onion and water chestnuts.

Start browning your ground meant.  Break it apart into small chunks.

Add your onions and continue browning.

Add the water chestnuts and continue cooking for a few minutes.  You want them to retain most of their crunchiness.

Add your seasoning and stir.

Serve your stuffing on the lettuce leafs.  They can be a little messy, so make sure to lean over your plate!  I like to add some sriracha to mine for a little added spice.  Enjoy!

Let me know if anyone is interested in the best technique for cooking potstickers.